SSH reverse port forwarding is a technique that powers services that let you instantly share any server application on your LAN to the public Internet. After realizing that these services are not so secure as you might think, I decided to roll my own tunnelling service by the name of Tunnelvision.
Wouldn’t it be awesome to instantly show the web application you are developing from your
local machine to the rest of the world? You know, just as a sneak preview without going
through the motions of a full deployment. Or perhaps you are developing a server and a
mobile app at the same time, and the two cannot talk to each other because they are not on
the same localhost.
Sure, one can run a HTTP server inside a LAN on any unprivileged port of your choosing, but this approach is not totally satisfactory. For example, iOS rejects plain HTTP requests ever since the introduction of Apple Transport Security in 2015. Even so, your colleagues/clients may not be in the same network you are, so we need something that uses HTTPS and works everywhere.
The technique that is employed to solve this problem is called reverse port forwarding,
which is something you can do with the good ol’ ssh client. There are several services
that let you do it without any hassle from your part. Serveo and
localhost.run are both free and support HTTPS. Services sharing a
similar idea but shipping with a custom client app include ngrok and
localtunnel. Of these, ngrok is the tool
powering Expo, the popular React Native framework, and I first learned
about localtunnel back in 2012 from a talk given by Paul
Irish.
But mind you, these services are not only able to eavesdrop but they are also able to modify everything flowing through them. They are essentially men-in-the-middle. This is the case no matter how well the data is encrypted in flight. Given that none of these tools let you audit their source code makes me disregard them for the work I do for my clients. There should be a way for organizations to run something like Serveo in their own infrastructure with full control and transparency.
Besides, it turns out that reverse port forwarding is really easy to accomplish with NodeJS streams. Everything boils down to wiring together two TCP sockets, one of which is handed to you by a HTTP server and the other of which is handed you to by a SSH server:
req.socket.pipe(ssh.socket).pipe(req.socket);
I thought to myself: “Heck, if it’s this easy, I’ll roll my own reverse port forward
server!”. I wanted to reuse the idea of using ssh as the tunnel client. But in addition
I wanted to create something that is easy to audit, easy to deploy to (AWS) cloud
infrastructure and connect to a domain you control. I present to you
Tunnelvision! What follows are my notes on creating the
service.
The server
Suppose you developing a web application called webapp which you run locally on
localhost. For example, you might use PHP like so:
# php >= 5.4
php -S localhost:8080 -t .
The basic idea of the Tunnelvision server is to make it possible to tunnel requests to
https://webapp.tunnelvision.me to your http://localhost:8080 simply by running
# Consult ssh(1) for the command-line flags.
ssh -TR 443:localhost:8080 webapp@tunnelvision.me
The trick is to run a custom SSH server at tunnelvision.me:22 that allows anybody to
connect as long as the username, i.e. webapp in the example, is not already taken. The
server then keeps a reference to the SSH socket in a hashmap under the key
webapp.tunnelvision.me. Once Tunnelvision receives HTTPS requests with a host header
webapp.tunnelvision.me, the server proxies the request to the appropriate SSH
socket. Simple! You may view the source code
here.
I decided to implement the server as a Docker stack consisting of three services: Nginx server, a NodeJS application containing the gist of the tunneling logic and a background service to request and renew TLS certificates from the Let’s Encrypt Certificate Authority. The design looks diagrammatically like this:
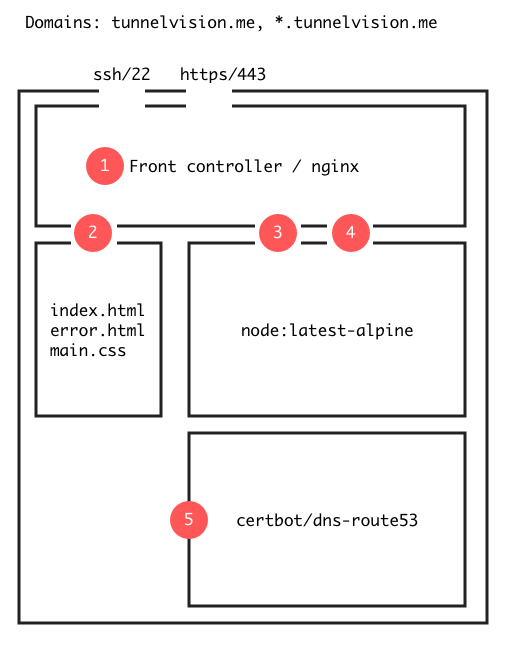
The Nginx container acts as a front controller and binds to the ports 443 and 22 for HTTPS
and SSH, respectively (1). The Nginx container serves the static welcome homepage from the
apex domain tunnelvision.me (2). Requests to subdomains *.tunnelvision.me and all SSH
traffic are proxied to the NodeJS container that binds to two unprivileged and unexposed
ports, e.g. 3000 for HTTP and 2000 for SSH (3, 4).
Notice that the HTTP port 80 is not exposed and all data in the system is encrypted in flight. You may then think that browsers that accidentally make HTTP requests are left to timeout. This is however not the case as Nginx can be configured to use the HTTP Strict Transport Security header that is a far superior solution to exposing 80 and redirecting traffic to the HTTPS endpoints.
Finally, the certbot service mounts a Docker volume that is shared with the Nginx container (5). The volume contains the Let’s Encrypt certificates that are read by Nginx and modified by the certbot script. Anybody who has tried to combine Docker, certbot and Nginx together have certainly noticed that instead of a ménage à trois you end up with a clusterfuck as described in this blog post. The problem is how certbot can verify that you control a given domain with a HTTP request if the server behind the domain cannot start since it lacks the certificates that you were trying to request in the first place.
Luckily, given that I want to host the service in AWS I found an elegant solution. One may change the default domain verification challenge to one using the AWS DNS service, Route53. All that is needed is an environment where the certbot script can read and write TXT records in Route53 and so verify that you indeed are the owner of your domain.
I must say that I am a big fan of Docker stacks. The beauty of this approach is that maximises the reuse of ready-made official Docker images and minimizes the need to mess with custom shell scripts/Dockerfiles. In addition, with some caveats, even the production stack can be tested in your local environment. In all, all of the above can be concisely described by a single YML configuration file:
version: "3"

services:
  nginx:
    image: nginx:latest
    depends_on:
      - tunnelvision
      - certbot
    ports:
      - "22:22"
      - "443:443"
    volumes:
      - letsencrypt:/etc/letsencrypt
      - ./server/nginx.conf:/etc/nginx/nginx.conf
      - ./server/tls.conf:/etc/nginx/tls.conf
      - ./server/ffdhe4096.pem:/etc/nginx/ffdhe4096.pem
      - ./server/public_html:/var/www/html

  tunnelvision:
    image: node:12.8.1-alpine
    env_file:
      - ./.env
    volumes:
      - ssh:/ssh
      - ./server/dist:/app:ro
      - ./node_modules:/node_modules:ro
    command: ["node", "/app/src"]

  certbot:
    image: certbot/dns-route53
    env_file:
      - ./.env
    volumes:
      - ./server/letsencrypt.sh:/letsencrypt.sh:ro
      - letsencrypt:/etc/letsencrypt
    entrypoint: ["sh", "/letsencrypt.sh"]

volumes:
  letsencrypt: {}
  ssh: {}
DevOps
The trickiest part of the whole project was automating the deployment. No doubt the problem is that I am still learning AWS (aren’t we all?) and I do not want to pay for anything (sound familiar?). I tried to play around with AWS ECS and Fargate but became rather disappointed. I do not want to configure VPCs or load balancers nor do I want an Amazon TLS certificate. They cost money!
But my main gripe with ECS Fargate is that it is such a leaky abstraction of the more fundamental AWS technologies such as EC2 containers and Autoscaling groups. ECS Fargate requires you to configure clusters, services, custom Docker registries with wonky domain names and whatnot and mess with CloudFormation templates and then somehow mix all that nonsense with Docker configuration hell to arrive at something that works.
I think the mistake is to include custom Docker images and CloudFormation in the mix. All that I would require is an S3 bucket to upload the Docker stack configuration file together with the required auxiliary files. Then, AWS should just Docker deploy the stack to some environment that I have separately set up with CloudFormation or the like. Ultimately, I ended up with something of this nature.
I decided that I will acquire an elastic IP and a domain and wire them together manually as the first one-shot preprovision step. As a second preprovision step, I decided to use GitHub to host my releases.
Then, with the help of the newly released Amazon Cloud Development
Kit, I wrote a simple stack in JavaScript that instructs
CloudFormation to provisions an Autoscaling group with a single EC2 container in a given
region in the default VPC. The EC2 instance executes a shell script provision.sh upon
boot. I was happy to discover that is very easy to bundle shell script into CloudFormation
templates once you construct your templates programatically in e.g. JavaScript.
The idea with the provision.sh script is that it stops and removes the default sshd
daemon, downloads the latest release from GitHub and deploys the Docker stack. The full
script can be found in the Github repo, but
essentially the last bit looks like this:
production_env() {
  # Environment variables for the Docker stack
  cat << EOF

NODE_ENV=production
...

EOF
}

launch() {

  pushd $1
  production_env | tee .env
  docker swarm init
  docker stack deploy tunnelvision -c production.yml
  popd

}

launch tunnelvision-$version
The provision script could be extended so that it would verify that the stack is up and running after some timeout. If so, the script could ask AWS to associate the elastic IP acquired before to the EC2 instance the script is provisioning. The instance would then become online. Otherwise, the script would ‘‘commit suicide’’ by asking AWS to terminate the instance. The latter outcome would then trigger the autoscaling group to try launching an EC2 instance again.
Conclusion
The project taught me several things about AWS, TLS and DNS. Working with Tunnelvison forced me to think about how HTTP servers interact with sockets, which is something that has very little to do with a given technology like NodeJS; it is more related to dissemination of information itself!
Before I came up with solutions where I served static files in NodeJS, wrote complex Dockerfiles and slow and clunky deployment pipelines. I feel the approach described here is the way forward and I hope AWS makes something like ECS Fargate but with better support for Docker stacks. I must say I am not an expert in these things. Dudes at work murmur the words Kubernetes and Rancher every now and then, but I haven’t checked those things out at all.
I hope you find the magic of sockets and tunneling as exciting as me. SSH sure is an interesting protocol, and it originates from my home country Finland, too!
I licensed Tunnelvision under the MIT license and you may use it for free as long as I
host Tunnelvision at https://tunnelvision.me. Better yet, I encourage people to try to
deploy the app to their AWS accounts and contact me with their experience.